Making a hollow form
Steps to woodturning through a small opening
Step by step procedure
Here is a photo article of the steps to produce a hollow form by woodturning through a small opening in the wood. The turner being photographed is Joe Traynham and the photographer is Bob Baker. Captioning is my myself, Andrew Hilton.
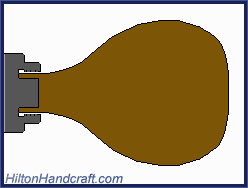 |
Click on the picture to the left to see an animated graphic of the process of hollowing out the inside. Where you should hollow first, second and so on. |
 |
Start out with a basic chunk of wood and form a tenon on one end of it so that the scroll chuck has something to hold onto. You'll be working the other end without any support from the tailstock in order to hollow it out. Shape the wood on the outside to whatever pleases you. Do be careful with how wide (diameter) it is though. Make sure you have a hollowing tool that'll reach out that far (from inside, of course). If it doesn't, you can always make your access hole larger in order to hollow out everything on the inside. |
 |
A side view. Everything is attached firmly. Make your tenon (that fits into the chuck jaws) as long as possible without bottoming out in there. It just be just a hair shorter than the jaws are long. A good, square (or ever so slightly tapered) shoulder on that tenon is essential for this type of scroll chuck. The dovetail chucks are different. Not the toolrest position here. Close but not too close. You'll need as much support for the tool once you get hollowed out deep in there as possible. |
 |
Front view, showing where Joe has already hollowed (actually, he simply drilled a hole in there with a forstner bit to start with. Saves a lot of time and effort doing it that way. Be sure to be completely done (I say that again BE COMPLETELY DONE) with the outside form shape, sanding and (sometimes) even finishing of the outside before you start to hollow. Even on these small hollow forms, once you start hollowing, the wood moves / warps. This makes going back to the outside worthless. |
 |
OK, here's Joe doing his thing. Standard hollowing position. He's using a Sorby Multi-tip hollowing tool here. Nothing fancy. Just straight-up woodturning by hand. |
 |
A better view. Work you way from "inside to outside" in there. Opposite of what you'd be doing with hollowing a side-grain bowl, for instance. Take small "bites" at a time. Try not to hit the rim of the opening you've made. |
 |
Joe is from Oklahoma. 'nuff said. |
 |
No, actually, this is quite common. Sometimes, it's just simply easier to sit on the bed of the lathe in order to work comfortably while hollowing. He's really cranking that tool here trying to get the hollowing done quick in this demonstration. That's probably why he got up there to put some serious leverage to it. |
 |
See where Joe has the butt-end of that tool? THAT's why you need to leave plenty of room between the wall and your lathe, folks! To get up under that lip and starting down the side, you'll need extra room out there to get the tool in the right spot. Either that, or just swivel the head on that tool a bit. But that's just a pain to do all the time. |
 |
|
 |
A better shot of what's happening. Joe moved the toolrest out a bit so we could get a better shot. You wouldn't want to keep the toolrest out that far from the wood normally. |
 |
Chips and dust are flying! |
 |
Which brings us to a sad reality with hollow forms. Not so bad with the large-ish opening on this particular form, but it can be downright annoying with others. All of that stuff you're hollowing out gets trapped inside there instead of falling down and out of your way. You have to clean out all of that stuff .... constantly! If you don't, you're not going to be getting as good or quick of cut in there. AND you can even jamb up your tool causing some serious damage (to your hollowform and yourself too). So clean it out really often. Joe is using some compressed air to blow it out. Notice that hand on top? Experience counts here ... that's for keeping the blown out stuff out of your face. |
 |
"Now THAT's smoooooth !" |
 |
Wake up Joe !!! We're not done yet. Here, he's pulled out the big gun (a Sorby Texan-sized hollowing tool). Size does matter here. That longer, heavier tool is dampening the vibrations and giving him more leverage. It sure makes hollowing easier and more enjoyable. It'll also give better results with smoother cuts. |
 |
Sanding the rim |
 |
Sanding the inside of the rim |
 |
Sanded. Not even my wonderful narration can make sanding any more exciting. But, sanding is extremely important. It can ruin an otherwise perfect form. This was sanded up to 600 grit, I believe. |
 |
HEY!, what happened? Did the world shift? I
thought that hollowform was facing the other
direction?!?! Yep, it was. What's happened is that Joe likes to "finish off the foot" of his pieces. That means that he is now going to reverse the hollowform and do as much turning on the foot of it as possible. Instead of just chopping off (or parting off) the foot from what he just hollowed, he'll do some fancy (and intricate) turning on the bottom in order to make it look nicer. |
 |
A closeup of what he's going to do. You can see in the previous picture that the hollowed-out area is now on a tapered cone (which is now in the scroll-chuck). This keeps that end of the hollowform centered on the lathe. The live center on the foot-end of the hollowform must be veeerrryy carefully positioned ... and re-positioned ... and re-positioned, etc. until the entire hollowform is running as true as possible. DON'T tighten that tailstock up too much. You'll push the hollowform up onto that cone too hard and CRACK. yep. |
 |
Joe is using a spindle gouge (this is a great spot to use an actual detail gouge, by the way) to very lightly take that foot down and make it flow nicely along with the rest of the outside of the piece. He's also making the very bottom of the foot a little concave so it'll rest on a table just on the outside rim of the foot. Very delicate work here. Go too far and you'll "go through" the piece where you've hollowed it on the inside. Don't take enough off and the piece feels / looks too bottom-heavy. |
 |
Sanding. Still not exciting. *sigh* |
 |
Saws off the very last little bit hanging on at the bottom of the foot. VERY IMPORTANT... Don't just twist, rip or try to knock off that little thing. You're likely to take the bottom of that foot with you leaving a hole all the way through it. Been there, done that. Treat that little nubbin carefully every time. You worked hard to get to this stage. Don't mess it up now. |
 |
Joe is using a handheld drill with a foam pad / sandpaper attachment to gently sand the bottom of the foot. |
 |
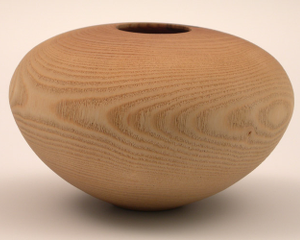
Finished piece. Actually, it does need some finish applied to it now. Nice bit of spalting in there. Good looking form. |
 |
Have fun making your own woodturned hollowform! |