Woodturning Kit Projects
Small Kaleidoscope
Step by step procedure
Woodturning doesn't always involve expensive or large pieces of wood. Often, you can make many beautiful and functional things from just limbwood. That's right, just from your trees' limbs!
Here is a great example and can be a project done by novice woodturners. It's a mushroom!
Let's see how a friend of mine, Joe Traynham, does it. Credit goes to Bob Baker for taking the photos.
 |
Joe is cutting off a section of some nice African Bubinga (the rest of which I later bought by the way) to the length that he needs for this project. |
 |
Next, a hole must be drilled through down the center in order to mount the wood in the mandrel. |
 |
|
 |
Now you see the blank mounted in the mandrel. The tailstock is now going to be pulled up to support the end of the mandrel. |
 |
|
 |
Roughing down the wood to round. |
 |
Don't you just love chips flying? |
 |
Just about round. |
 |
After it is round and down to about the thickness you want, you need to mark your center point on the wood (see the line?). You can see that he's tapering the ends down to provide a smooth transition to the brass ends he'll put on later. |
 |
|
 |
Marking the center again. |
 |
A closeup view of some beads. |
 |
Cleaning up the taper at the ends to form a nice curve and getting the ends down to size. |
 |
It's time to sand! |
 |
A closeup of the sanding |
 |
Joe doesn't spend that much time sanding. He just looks like he's concentrating so much on it here, right? |
 |
Ohhhhhh That's SMOOTH, Joe ! |
 |
A little friction polish makes that Bubinga shine, baby! |
 |
|
 |
Look, MA! No tailstock !!! He's just about to take the project off the mandrel right now anyway. |
 |
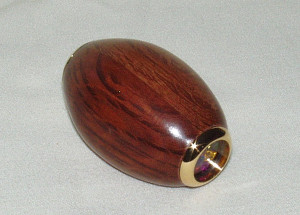
Tada ! But it's not done yet, folks. |
 |
You've got some hardware to install first. Here you can see it all laid out. * The kit hardware is very much like the "mini kaleidoscope egg-type" kits you'll find in catalogs and online stores. About 2.5" to 2.75" inches long. It's not actually from any of those places, however. It came from a (now defunct) store called Woodworking 101. But the basics are the same as what you'll find these days. |
 |
Put that in there ... this over that ... but not before you put this thingy in here. Hey, Joe, where's tab A suppose to go? And what about slot B? I really wish these things were labeled <sigh> |
 |
A closeup of what makes a kaleidoscope a kaleidoscope. Pretty beads. |
 |
NOW ..... TADAAAAA ! Nice. Very nice. I'm going to enjoy the rest of that African Bubinga. |