Projects from Limbwood
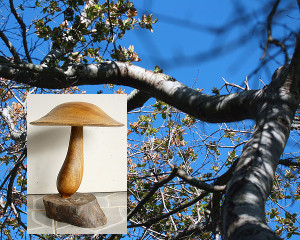
Mushroom ... aka Gnome Home
Step by step procedure
Woodturning doesn't always involve expensive or large pieces of wood. Often, you can make many beautiful and functional things from just limbwood. That's right, just from your trees' limbs!
Here is a great example and can be a project done by novice woodturners. It's a mushroom!
Let's see how a friend of mine, Joe Traynham, does it. Credit goes to Bob Baker for taking the photos.
 |
Joe takes that other piece of Pear and makes a home ... a Home for a Gnome! |
 |
Start out by putting the piece between centers using a spur drive in the headstock end. Here you can see Joe cutting a tenon on one end. This is going to be put into a scroll chuck so he can form the top of the mushroom later. Be sure to make a clean and square tenon here! |
 |
Joe has put the mushroom tenon into the scroll chuck but still has the tailstock up against the end. It's always best to use the support of the tailstock whenever possible. You can see that he's starting to form the top of the mushroom now. |
 |
Continuing to form that cap. |
 |
Everybody was waiting to see the Gnome
that was going to call this thing Home. Jon wasn't
around.
(Why I give Jon such a hard time I don't know .. he's just such a good sport about it! Hope he doesn't ban me from the place.) |
 |
The cap is roughed out and now Joe is working on roughing out the stem. |
 |
A bit more refining of the stem and base. |
 |
The tailstock has been pulled back and out of the way. This allows the cap to be fully formed across the top. Joe is using a shallow gouge (spindle gouge) with a light touch here. |
 |
Pretty little ribbons of wood coming off that gouge! |
 |
|
 |
This shows the hand position when making these fine cuts. |
 |
The completed cap. Mushrooms look best when they're a little offcenter. All you have to do is just find a piece of wood that's not perfectly round. |
 |
You can see that Joe leaves the bark on
in places. It looks great that way.
Working on the stem to get it thinner and have a good transition to the base. |
 |
HEEERRREEEE comes the sandpaper !!! |
 |
Really get in there and make it shine. |
 |
Watch out for that scroll chuck. You can see that Joe uses small pieces of sandpaper. Why? For one reason, he doesn't need that much because of his fine technique with the tools. For another reason, he doesn't want large pieces of sandpaper that'll potentially get caught and ripped out of his hands. |
 |
A little friction polish. |
 |
|
 |
Some more here and there |
 |
Part it off. |
 |
TADA ! Hey, Jon. Where'd he go? Anybody see Jon? |
 |
And the crowd goes wild. This is a good and quick project that gives you something to do with those small limbs ... and the Gnomes. |